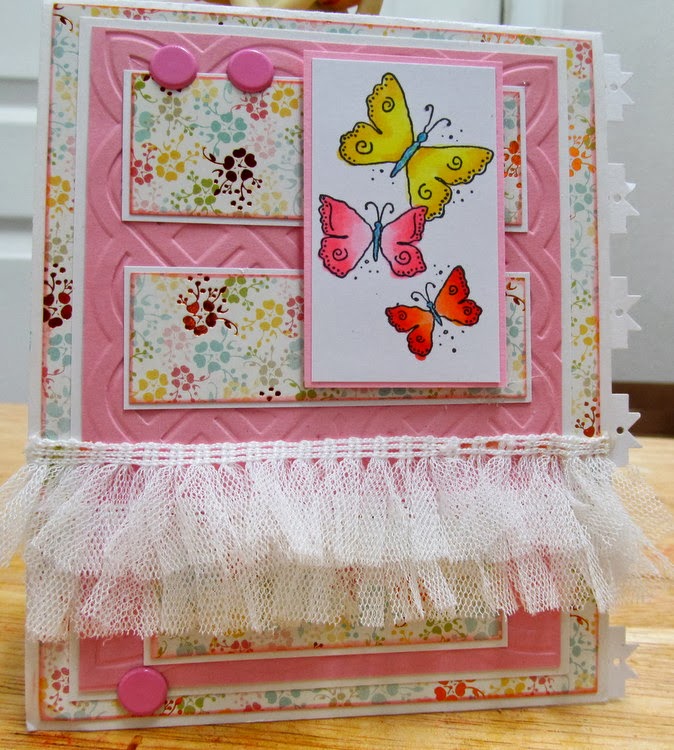
Linked Banner

People Who Leave A Great Impression On Us

Thursday, October 31, 2013

BOO! aka Happy Halloween!

Hello again, friends!  Happy Halloween!!!  In honor of the holiday, I've created a spooky scene using stamps from the Great Impressions Rubber Stamps store!  If you're wondering how I colored in the image...it's Liquid Pearls! ;)

Here's my creation~

Details~


Products used: A135 Boo!H140 Pumpkins in a Row.

Come back next week for another creation using these fabulous stamps, and stay tuned for another video tutorial in 3 weeks!  We'll be doing some collage stamping--and I'll be making a holiday tag!

Here's what you'll need for that tutorial:


Thanks so much for stopping by to take a peek at my creation! Stay safe tonight while trick or treating, and send some candy my way! ;)  HUGS and spooky stamping, friends!

Wednesday, October 30, 2013

Final Three

Hi everyone today I am sharing 3 of my favorite projects I did as an Great Impressions Design Team member as I party ways.  I had an amazing time designing with some of the best in the craft world and I am sure we shall cross paths again as I move on to different exciting ventures!!

My first post is this tag I made 


  I totally loved how this tag came out I wasn't sure how it would look with all the pink flowers, but overall I love the look.  I used Flower Girl G482


My 2nd post to share is this card and I promise I not all pink by design lol..

This is a card I made using Great Impression Lacey Butterflies

I added some fringe lace  and some snaps 


My final project for the day is this card I made using some of 

 these adorable stamps from Great Impressions so super cute and a perfect size.  This cute girl is Pumpkin Patch Patty!
I added some ribbon and I used a few different sets from Spellbinders 

I hope everyone enjoyed my post and enjoyed my time with Great Impressions!!


Monday, October 28, 2013

CAS Autumn

Hello friends! Today I have an Autumn/Fall card for you. This one is super Clean and Simple. I started stamping the image and sentiment onto my card front in Jet Black Archival Ink, then I stamped another pumpkin image in memento tuxedo black, colored it with Copic markers and cut it out. Added it on top of stamped image with Dimensionals. Then I color the leaves from the sentiment and added StartDust  Stickles.
Finally, I added a little strip of Patterned Paper at the bottom of the card.


These are the stamps I used:

Hope you like it.
Have a fantastic day!
Giovana

Saturday, October 26, 2013

Best Of | Part 2

Good morning! Erin here. For my final Great Impressions Stamps post, I have five more cards that use some of my favorite Great Impressions Stamps. And like last week, I will link to the original blog post and stamp set(s) used.

The first card combines so many of my favorite elements: Kraft, buttons, pink, gems, hexagons, a fun swirly stamp... into one very colorful birthday card! The stamp I used was Simple Elegance, and here is the original blog post.


Butterflies are another favorite of mine (I own too many butterfly stamps to count!), and the GI Tiger Swallowtail stamp is just lovely. Here is a link to the original post.  


This watering can of flowers was one of the first stamps I picked out from Great Impressions. The various blooms in the sweet little can make for a lovely sympathy card. Here is the stamp and you can find the original post here.


Autumn is my favorite season, and I couldn't resist this beautiful fall themed stamp. You can find the stamp here, and the original post here.


The final card I have to share features this lovely Flower Bouquet stamp. The red and black color combo really pops on kraft cardstock. You can find the stamp here and the original post here.


That wraps up my final post for Great Impressions Stamps. I am going to miss the wonderful women I have had the pleasure of working with this past year. Thanks for everything! 

xoxo,
Erin.

Friday, October 25, 2013

Wrought Iron Pumpkins

     I love the effect of this die over the multicolored Halloween paper and think that it really sets off the Pumpkin Flourish image. I decided to do something a little different and didn't pop my pumpkins at all for this card.  I did add plenty of sparkle though. I completely covered the flourish with glitter pen.  I like the way it gives a very fine sparkle in a subtle sort of magical way I can't give up all my bad habits now, can I?


  The Pumpkins are colored with colored pencils and odorless mineral spirits and then given a touch of the same glitter pen as the flourish.  The pumpkin flourish is a beautiful image and works well for Halloween, Autumn and Thanksgiving.

Mary Anne

Thursday, October 24, 2013

Split Negative Technique

Hello again, friends!  It's another Thursday and so it's time for my weekly post  using a fabulous image and a gorgeous sentiment from the Great Impressions Rubber Stamps store!  This week is a video tutorial week, and we're going to be learning the SPLIT NEGATIVE technique!!

Here's the card I've made~


Here's the video tutorial for the technique~


Products used: B178 With SympathyF459 Dotted Winter Tree.

It will be 3 weeks until the next technique tutorial, so you've got plenty of time to order and/or gather the supplies you'll need for that technique!  We'll be doing some COLLAGE STAMPING!  I'll be making a tag for a holiday gift, but this fun technique lends itself to all types of paper crafting!

Here are the supplies you'll need for that:


Thanks so much for stopping by to take a peek at my creation!  HUGS and happy stamping, friends!


Wednesday, October 23, 2013

Float

Hi everyone Monica here with here with another post for Great Impression I made this card with the idea of feeling peaceful, but well I am not sure if I did a good job.  Nonetheless, I love how it came out.   I used 2 different stamps for this project - Seashore and Hot Air Balloon


But if you look the pelican looks at peace to me right?!  The clouds floating along in the background as you just catch a glimpse of a hot air balloon floating by...

Thanks for stopping by everyone
Simply Monica

Monday, October 21, 2013

Little new baby

Hello friends! Today I want to show you a baby card I made for a friend from church who is having a baby girl any minute. I think this card is super cute!  First, I stamped the image on Ivory cardstock in Memento Tuxedo black, then I paper pieced the little baby clothes, colored the clothesline with a Prismacolor pencil and added little dots with Ruby Red Liquid Pearls. I matted the panels and added stitches. Added a big satin bow and a paper flower.


These are the images I used:
Hope you like it!
Happy Monday and Happy Crafting!
Giovana

Sunday, October 20, 2013

Ghouls Night Out


Hello Friends!

Today I have a super fun card I created for the 

I took the image Halloween Ghost from our newest release and went to town.  The image actually has legs and feet.  Super cute!  For this card though, I masked off the bottom half of the ghost, stamped it twice on Vellum, heat embossed it in black and fussy cut them out.  Next I stamped the image on designer paper twice, cut out and glued them together with a glue pen. The ghost on the left is popped up with dimensionals.  The sentiment makes me smile and is computer printed. I really like how this turned out. Here is a close up of these ghostly girl ghoul friends. (smile!) 


There is still plenty of time to join in the 
Great Impressions Stamps Monthly Challenge.  
This month all you need is a button and a bow.

Enjoy your Sunday!

Hugs,

Jenny


Supplies
Not Shown:  American Crafts Hip Hip Hooray Designer Paper
(I found at Target)


Saturday, October 19, 2013

Best Of | Part 1

Good morning! October is coming to an end, which means I only have two more posts for you guys. I thought it would be fun to go back and pick my top ten cards using some fabulous stamps from the Great Impressions store. I am going to feature five in today's post, and five next Saturday. Before each card I will list the stamps used, plus a link to the original blog post where the full supply list can be found. 

First up is a birthday using an adorable ice cream stamp that looks fabulous colored in or paper pieced. Stamp used: One Scoop On Top of Another. And here is the original post.

  
Next I have an aqua and green encouragement card using a lovely stitched flower stamp. Stamps used: Wishing You and Stitched Flowers. Here is the original blog post.

The next card features my favorite sentiment from Great Impressions. It is perfect for sending a quick note to a friend. Stamps used: Watering Can of Flowers and A Little Hello. Here is the original blog post.


Sometimes my favorite stamps are basic backgrounds. For this card, I used one stamp, Elegant Motif, and stamped it across the front of the card in several different colors. I love how this card turned out! Stamp used: Elegant Motif. Here is the original blog post.


The final card I want to share today is a favorite because of the adorable owl stamp. And a pink owl? It doesn't get any better than that! Stamp used: Love Struck Owl. Here is the original blog post.  


I'll be back next Saturday with my final Great Impressions Stamps blog post, and five more favorites! Thanks for stopping by and have a wonderful weekend! 

Erin.

Thursday, October 17, 2013

Happy Anniversary!

Hello again, friends!  It's another Thursday and so it's time for my weekly post using a fabulous image and a gorgeous sentiment from the Great Impressions Rubber Stamps store!  It's about a month until my 9th wedding anniversary, so I've got a card I've made for my husband to share with you!

Here's the card~

Details~


Products used: E705 Love BirdsE42 Happy AnniversaryMy Mind's Eye Enamel Dots.

Next week will be another video tutorial, so don't forget to grab the supplies you'll need for the technique--Split Negative!

Here's what you'll need for that tutorial:

  • F459 Dotted Winter Tree
  • B178 With Sympathy
  • Black and white cardstock
  • Black ink
  • White ink or Versamark ink & white embossing powder
  • Embossing gun (if needed)
  • Paper, ink, embellishments for finishing your project
Thanks so much for stopping by to take a peek at my creation!  See you again next week for another video tutorial!  HUGS and happy stamping, friends!


LinkWithin

Related Posts Plugin for WordPress, Blogger...